Community
- Forums Home
- >
- Arnold
- >
- Arnold for Maya Forum
- >
- How to improve global illumination in interior renderings
Arnold for Maya Forum
Rendering with Arnold in Maya using the MtoA plug-in.
Turn on suggestions
Auto-suggest helps you quickly narrow down your search results by suggesting possible matches as you type.
Reply
Topic Options
- Subscribe to RSS Feed
- Mark Topic as New
- Mark Topic as Read
- Float this Topic for Current User
- Bookmark
- Subscribe
- Printer Friendly Page
Message 1 of 15
06-29-2021
10:46 PM
- Mark as New
- Bookmark
- Subscribe
- Mute
- Subscribe to RSS Feed
- Permalink
- Report
06-29-2021
10:46 PM
How to improve global illumination in interior renderings
Hello to all experts.
I have made these interior renderings with latest arnold for max 2022.


I used a skydome with no exposure and intensity 0.5 and with no hdri attached. Just a color.
To all windows I have positioned portal lights.
Of course no exposure control in environment settings.
I used only some two-three quad lights from the roof to the floor in the interior space with
an arnold decay filter and near attenuation enabled
I tried to increase imager exposure as much as I can with a value of 4 and
imager tonemap with Toe Strength 0.2, Toe Length 0.7 and Sloulder strength, length and angle, all of them with a value of 1.0
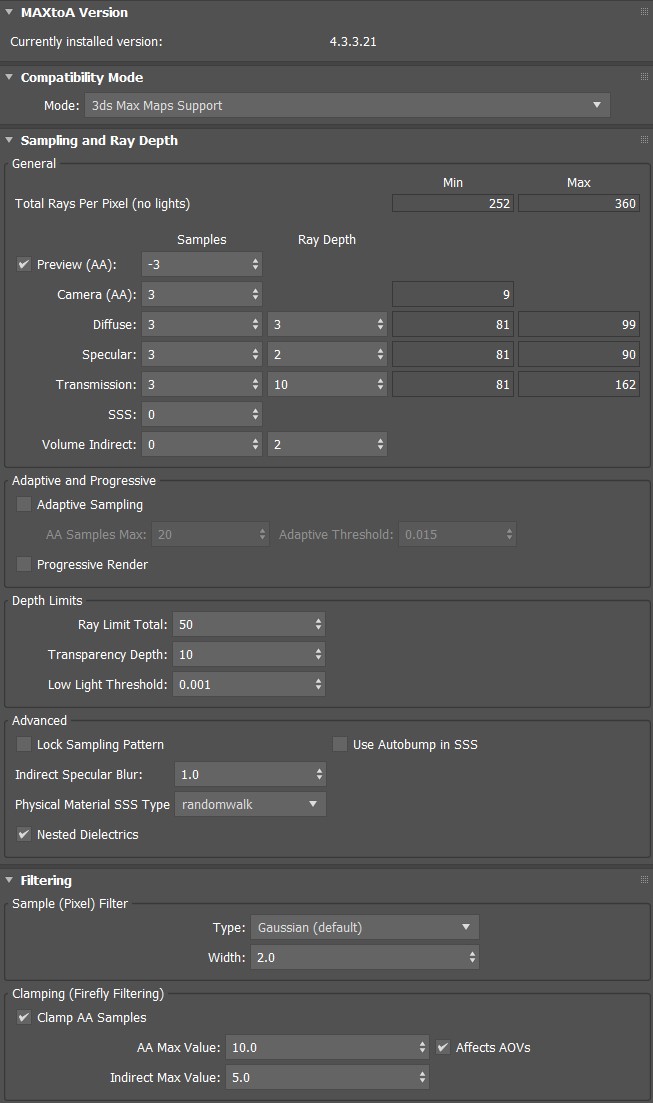
My arnold settings are these:
https://i115.fastpic.ru/big/2021/0630/d0/cb19b7a1eeff6bbad297ce1b2542c3d0.jpg
The question I have is how to make my renderings brighter but without burning the textures?
Please look at the ceiling for ex. is a little dark for me. Is it normal?
In general does my scene gets the maximum I can (20' each picture in an old HP Z620)
or can I have more improvements and where?
I don't use any post production.
Should I start to use aovs and compose them in photoshop?
I am used just to render and sent it as it is to my clients.
My current client sent me also these renderings references as the result he want to have:


Any advice please is crucial to me.
Thanks.
14 REPLIES 14
Message 2 of 15
06-29-2021
11:17 PM
- Mark as New
- Bookmark
- Subscribe
- Mute
- Subscribe to RSS Feed
- Permalink
- Report
06-29-2021
11:17 PM
I think once 3ds Max has color management this will be less of an issue.
I would be curious to see how these scenes are lit. It looks like your renders are primarily lit with indoor lighting, whereas the photos have a combination of strong exterior with interior lighting. Maybe you could increase the exposure of the skydome lighting in your scenes. Also, it is hard to tell, but do your materials have specular/coating? All walls, ceilings, and floors should have some. It should react better with the lighting and give the scenes more depth and realism. Hope that helps. Maybe post your results here so that we can advise further.
https://dochttps://docs.arnoldrenderer.com/display/A5AF3DSUG/Skydome+Lights.arnoldrenderer.com/display/A5AF3DSUG/Quad+Light
Lee Griggs
Arnold rendering specialist
AUTODESK
Arnold rendering specialist
AUTODESK
Message 3 of 15
06-30-2021
04:19 AM
- Mark as New
- Bookmark
- Subscribe
- Mute
- Subscribe to RSS Feed
- Permalink
- Report
Message 4 of 15
07-01-2021
04:10 AM
- Mark as New
- Bookmark
- Subscribe
- Mute
- Subscribe to RSS Feed
- Permalink
- Report
07-01-2021
04:10 AM


What I've changed from my previous settings:
Skydome intensity from 0.5->2.5
Skydome shadows density from 1.0->0.99
Imager exposure from 4.0->3.0
Imager Filmic tonemap:
Toe Strength from 0.2->0.5,
Toe Length from 0.7->0.5
and of course relfections the more I could assign to my textures.
But the most important Lee is what I noticed when Skydome penetrates interior scenes:
Regarding reflections I put 0 as specular contribution because not only it burns my floor textures but can see the portal reflections wich I have to avoid completely.
Regarding shadows? OMG, how many times my clients said me, I want white images, bright images, why the ceiling is dark?
The only solution I discovered that made my renderings evenly whiter is to turn down just a little that Shadows density, with a value of 0.99. Not more, because the more I decrease it, the more my images becomes completely flat.
I think that skydome must have an extra option for interior scenes, or that a new global illumination light should be created exclusively for interior scenes. Skydome as it is right now with the shadows and the reflections that produces it just don't work for interior renderings and messes up everything.
Waiting your advices...
Big Thanks to all you masters: Lee, Mads, Ciro, Eloi, Zap and so many others...
Message 5 of 15
07-01-2021
07:54 AM
- Mark as New
- Bookmark
- Subscribe
- Mute
- Subscribe to RSS Feed
- Permalink
- Report
07-01-2021
07:54 AM
Petros, are you able to upload a simple scene somewhere? Maybe send it privately if you can't post the link here and I will have a look at it.
Lee Griggs
Arnold rendering specialist
AUTODESK
Arnold rendering specialist
AUTODESK
Message 6 of 15
07-01-2021
08:11 AM
- Mark as New
- Bookmark
- Subscribe
- Mute
- Subscribe to RSS Feed
- Permalink
- Report
07-01-2021
08:11 AM
Maybe you need to increase your ray depth? That will brighten up the scene and make it more realistic. Try something large like depths of 10.
Message 7 of 15
07-01-2021
08:18 AM
- Mark as New
- Bookmark
- Subscribe
- Mute
- Subscribe to RSS Feed
- Permalink
- Report
07-01-2021
08:18 AM
I have it on 3, but I had the same thought and I think I tried 10 with no significant difference.
I will try again.
Message 8 of 15
07-01-2021
08:26 AM
- Mark as New
- Bookmark
- Subscribe
- Mute
- Subscribe to RSS Feed
- Permalink
- Report
07-01-2021
08:26 AM
Yes Lee thanks.
I have archived everything. Here it is.
Just put a full transparent glass material on the windows surfaces (because they are created with a script) if max cannot read them correctly.
Message 9 of 15
07-02-2021
02:29 AM
- Mark as New
- Bookmark
- Subscribe
- Mute
- Subscribe to RSS Feed
- Permalink
- Report
07-02-2021
02:29 AM
@Lee Griggs I was watched this video and I was wondering why arnold dont have a global illumination button in settings? In vray only with a skydome and a hdri and everything is rendering perfect regarding an interior architectural scene. In arnold.... everything is a disaster. Skydome+hdri+portals and boom: dark ceilings and unhappy clients. Seems that archviz is abandonded in arnold. I know I am not an expert, but I think something so simple is missing from arnold...
Message 11 of 15
07-02-2021
03:43 AM
- Mark as New
- Bookmark
- Subscribe
- Mute
- Subscribe to RSS Feed
- Permalink
- Report
07-02-2021
03:43 AM
Yes thank God to all devs, there are so many settings so yes
it's impossible something to miss. But you know Mads like the
cake is always on a disk, before starting to grading and calibrating,
I just wanted a base light fill the whole interior space. And that I cannot
archive it since now with arnold. Tried everything. Maybe in the wrong
way? I dont know.
Message 12 of 15
07-02-2021
08:28 AM
- Mark as New
- Bookmark
- Subscribe
- Mute
- Subscribe to RSS Feed
- Permalink
- Report
07-02-2021
08:28 AM
If I look at your images and look at the refference images, the very first thing I see is that your images are underexposed compared to the refferences.
This is entirely a post effect, don't spend time micro managing the lamps, if you do, set up a light mixer, things render fast for light look dev in ARV.
So crank exposure up first, contrast it more and bring the highlights a bit down, so not everything is blown out. Crush the blacks.
Message 13 of 15
07-02-2021
08:50 AM
- Mark as New
- Bookmark
- Subscribe
- Mute
- Subscribe to RSS Feed
- Permalink
- Report
07-02-2021
08:50 AM
Imager nodes can make your original setup look closer to the kitchen refference.
Lifted the mids, lifted the highlights, dialed back the blacks.
So you see, no need to render to get closer.
Put the images up in photoshop like this and train to match the exposure and contrast levels on random images.
Also pay attention to whitebalancing, in this case the room is very red, so I added a cold filter in a mix to get it nearer the middle.
My best recomendation looking forward is to take some fundamental classes in grading, move on to advanced grading. You can study Photoshop and render interior tutorials, plenty of those around, apply the theories to the Arnold Imager nodes in junction with your Arnold Light Mixer.
(scene related)
If you light the set with those ceeling lamps, do yourself a favor and light them up, so they are white.
Feels a bit odd that they are off, since shadows on the floor are there.

Message 15 of 15
07-13-2021
07:53 AM
- Mark as New
- Bookmark
- Subscribe
- Mute
- Subscribe to RSS Feed
- Permalink
- Report
07-13-2021
07:53 AM
1. Use ACES workflow.
2. Use higher ray depth values and let those rays bounce more in the scene.
3. I would also avoid clamping, cause it cuts some of the highlights and you have flatter image at the end. So, let it render more for cleaner image, instead of clamping.
I hope this helps.
Reply
Topic Options
- Subscribe to RSS Feed
- Mark Topic as New
- Mark Topic as Read
- Float this Topic for Current User
- Bookmark
- Subscribe
- Printer Friendly Page
